Custom Smart Home Device
Customize smart home control
Now that we have an understanding of the Smart Home control capabilities included with the kit, you will modify those capabilities to control attributes of the device itself rather than simply printing to the serial monitor. For this workshop, you will create a simple implementation that turns on the side green LED light via the PowerController and you will set the device to blink at a set rate using the Range Controller.
Customize smart home device attributes
Using your IDE, open the cloned Core2-for-AWS-IoT-EduKit folder and open the Alexa_for_IoT-Intro/components/app_smart_home/app_smart_home.c to take a look at where the Smart Home device attributes are defined. Scrolling down to line 109 app_smart_home_init() function and you will see the following code blocks:
/* Add device */
smart_home_device_t *device = smart_home_device_create("Light", alexa_smart_home_get_device_type_str(LIGHT), NULL);
smart_home_device_add_cb(device, write_cb, NULL);
smart_home_node_add_device(node, device);
The above block defines the “friendly name” of the device (the name of the device), the callback function write_cb that will get called when there is a state update message for this device, and attached the device to the overall smart home node. There can be more than one smart home device on a node.
Next, modify the Range Controller definition to change Brightness to Blink. Scrolling down a bit further to line 141, you can see where the different attributes of your device are defined:
/* Add device parameters */
smart_home_param_t *power_param = smart_home_param_create("Power", SMART_HOME_PARAM_POWER, smart_home_bool(true), SMART_HOME_PROP_FLAG_READ | SMART_HOME_PROP_FLAG_WRITE | SMART_HOME_PROP_FLAG_PERSIST);
smart_home_device_add_param(device, power_param);

smart_home_param_t *brightness_param = smart_home_param_create("Brightness", SMART_HOME_PARAM_RANGE, smart_home_int(100), SMART_HOME_PROP_FLAG_READ | SMART_HOME_PROP_FLAG_WRITE | SMART_HOME_PROP_FLAG_PERSIST);
smart_home_param_add_bounds(brightness_param, smart_home_int(0), smart_home_int(100), smart_home_int(1));
smart_home_device_add_param(device, brightness_param);
You must update the max blink count from 100 to 10. Change the brightness_param variable definition and the smart_home_param_add_bounds function call so that they look like:
smart_home_param_t *brightness_param = smart_home_param_create("Blink", SMART_HOME_PARAM_RANGE, smart_home_int(10), SMART_HOME_PROP_FLAG_READ | SMART_HOME_PROP_FLAG_WRITE | SMART_HOME_PROP_FLAG_PERSIST);
smart_home_param_add_bounds(brightness_param, smart_home_int(0), smart_home_int(10), smart_home_int(1));
Add smart home device logic
You’ve modified the properties but need to implement the logic to control the green LED. First, we’ll include a library to control the light and also define a few global variables:
#include "core2forAWS.h"
#define BLINK_DELAY 500
static bool green_light_status = 0;
Next, modify the power controller implementation to turn on/off the green LED. Look for the write_cb function (line 89 of the original file) and the following code snippet:
if (val.type == SMART_HOME_VAL_TYPE_BOOLEAN) {
    printf("%s: *************** %s's %s turned %s ***************\n", TAG, device_name, param_name, val.val.b ? "ON" : "OFF");

}
Now add toggle logic based on the values received by adding three lines of code so that the if statement looks like the following:
if (val.type == SMART_HOME_VAL_TYPE_BOOLEAN) {
    printf("%s: *************** %s's %s turned %s ***************\n", TAG, device_name, param_name, val.val.b ? "ON" : "OFF");

    //Set the global green_light_status variable to the desired value and set the GPIO1 value the right setting (on/off)
    green_light_status = val.val.b ? 0 : 1;
    Core2ForAWS_LED_Enable(green_light_status);

}
This takes the updated value of the power controller (1 or 0) to indicate whether the customer wanted to turn the device on or off, and turns the side green light on or off.
Next, implement the “blink” functionality. First, you’ll create a method to blink the green light a set number of times. Add the following function to the same app_smart_home.c file:
static void startLightBlink(int count)
{
    // Toggle the LED to the opposite of the LED state and get back to the original LED state at the end
    for(int i = (1 + green_light_status); i <= (count * 2 + green_light_status); i++) {
        Core2ForAWS_LED_Enable( i % 2 );
        vTaskDelay(pdMS_TO_TICKS(BLINK_DELAY));
    }
}
Now update the RangeController logic to call this function. In this case it’s in the following code block back in write_cb:
else if (val.type == SMART_HOME_VAL_TYPE_INTEGER) {
    printf("%s: *************** %s's %s changed to %d ***************\n", TAG, device_name, param_name, val.val.i);

}
We must add a call to our newly created startLinkBlink function, so we add the following lines here:
else if (val.type == SMART_HOME_VAL_TYPE_INTEGER) {
    printf("%s: *************** %s's %s changed to %d ***************\n", TAG, device_name, param_name, val.val.i);

    //call the Trigger Light Blink based on the desired number of actions
    startLightBlink(val.val.i);

}
Flash and test updated Alexa firmware
You have modified the project to include the necessary device attributes and the control logic to blink the onboard green LED at a specified rate. Now it is time to build the firmware, flash it on to the device, and test the capabilities. With the device plugged in and your PlatformIO CLI terminal window open and selected, enter this command:
pio run --environment core2foraws --target upload --target monitor
You can exit the serial monitor with the key combination CTRL + C. You can restart the serial monitor by entering the command pio run --environment core2foraws --target monitor .
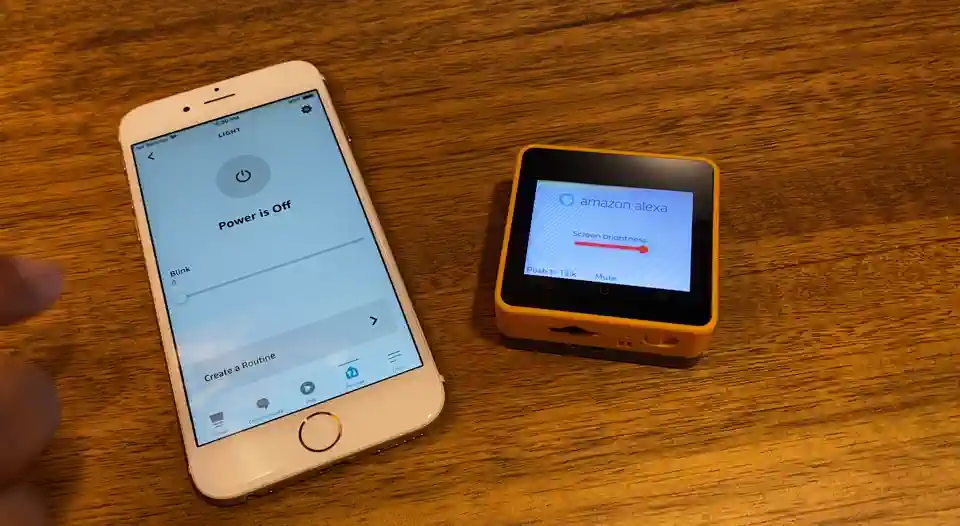
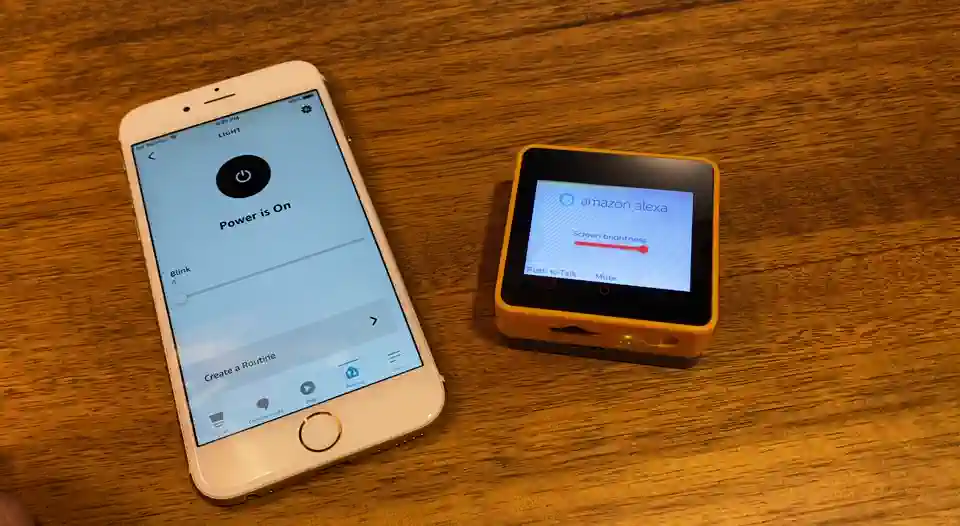
If all goes well, you will see an update in your Alexa app and you’ll be able to control the LED power:
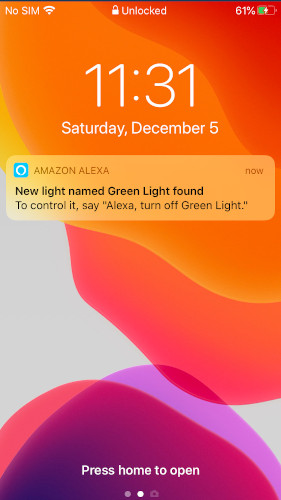
- Voice: Alexa, turn on/off green light light - the side green LED light should turn off and on
- Via the Alexa app - open your Alexa app (not the Espressif app), go to Devices and then either “Lights” or “All Devices” and you should see the device named Light (see screenshots below). Tap the power icon and you should see the icon toggle between off and on.
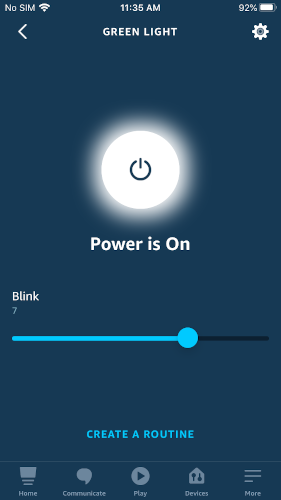
You can also test the Blink functionality:
- Voice: Alexa, set blink to 7 - the side green LED light should blink 7 times
- Via the Alexa app - From the Light device in your Alexa app (not the ESP Alexa mobile phone app), adjust the slider between 1 and 10 and the device should blink the specified number of times.
Congratulations, you’ve completed this tutorial! On to the Conclusion .
Questions? Please use AWS re:Post
AWS IoT Kit now features direct access to
AWS re:Post
, which is a community-driven, questions-and-answers service. Search re:Post using the
AWS IoT Kit
tag to see if your question has been asked and answered. If not, ask a new question using the AWS IoT Kit tag.