Connect to AWS IoT Core
In this lesson, you will configure, build, and flash your device’s firmware so that your device can communicate with AWS IoT Core. To do this, you must configure your device with your local Wi-Fi credentials and your AWS IoT endpoint’s URL.
Establishing a secure MQTT connection is simplified with the AWS IoT Device SDK for Embedded C and the Microchip ATECC608 Trust&GO pre-provisioned, secure hardware certificates. With the secure element, you do not need to retrieve certificates from AWS IoT Core or generate your own to connect. The connectivity libraries in the AWS IoT Device SDK for Embedded C simplify connectivity and access to AWS IoT services and features.
Configure the ESP32 firmware
Your source code configuration is handled through Kconfig . The Linux kernel also uses the Kconfig configuration system to simplify their configuration options ( symbols ) into a tree structure.
Complete the following steps to open the KConfig menu:
- Return to VS Client and open a new PIO terminal window.
- Navigate to the Blinky-Hello-World directory in the PIO terminal window.
- Issue the following command in the PIO terminal window to configure your device:
pio run --environment core2foraws --target menuconfig
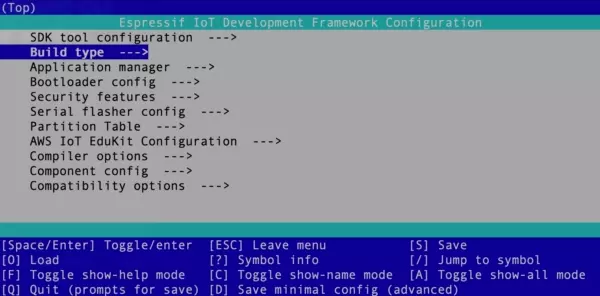
Complete the following steps to configure your local Wi-Fi when the Espressif IoT Development Framework Configuration window appears:
Navigation in the Espressif configuration window may vary based on your computer. To navigate up and down the menu, use k and j, or - and +, or up arrow and down arrow.
- Navigate to AWS IoT Kit Configuration and press Enter on your keyboard.
- Choose WiFi SSID.
- Remove the default SSID (AWSWorkshop) and enter the service set identifier (SSID) for your local Wi-Fi network and press Enter.
- Navigate to and choose WiFi Password.
- Remove the default password and enter the password for your local Wi-Fi network and press Enter.
- Enter s to save these settings, press Enter to confirm the file location, and press Enter again to close the message box.
- Enter q to quit configuration and return to the PIO terminal window.
Be sure your SSID is for a 2.4GHz network. The ESP32-D0WD on the M5Stack Core2 for AWS hardware does not support 5GHz Wi-Fi bands.
Build, upload, and monitor the Blinky Hello World firmware
You are now ready to build (compile) and upload the Blinky Hello World firmware. This is the same process that you performed during the Getting Started tutorial.
- Issue the following command to build the firmware (note: this may take several minutes):
pio run --environment core2foraws - When the build completes, issue the following command to upload the compiled firmware to the connected device through USB and monitor the messages sent over serial output to the host machine:
pio run --environment core2foraws --target upload --target monitor
If, during upload or while monitoring the serial output, you receive an error about an incorrect port or timeout, open the platformio.ini file, and follow the instructions there to manually set the upload port.
Conclusion
In this lesson, you successfully compiled the firmware updates, flashed your device, and monitored its serial outputs. Your Core2 for AWS then used the AWS IoT Device SDK for Embedded C to authenticate with the MQTT message broker (AWS IoT Core. Your device is ready to receive messages.
You are now ready to control the LEDs on the side of your device. Continue to Blinking the LEDs .
Questions? Please use AWS re:Post
AWS IoT Kit now features direct access to
AWS re:Post
, which is a community-driven, questions-and-answers service. Search re:Post using the
AWS IoT Kit
tag to see if your question has been asked and answered. If not, ask a new question using the AWS IoT Kit tag.