Run the ESP RainMaker Agent
In this lesson, you will compile and upload your application to the Core2 for AWS, provision Wi-Fi through the ESP RainMaker Phone App, register a user to assign the devices, and control the on-board peripherals as virtual smart home devices over AWS IoT.
Open the project in PlatformIO
There are several folders at the repository root that you cloned from GitHub during the last lesson. For this tutorial, use the Getting-Started project folder and perform the following operations through PIO.
Complete the following steps to open the project in PIO:
- Open the VS Code application.
- Choose the PlatformIO logo in the VS Code activity bar.
- Choose Open from the PIO Home menu.
- Choose Open Project, navigate to the
Core2-for-AWS-IoT-EduKit/Getting-Startedfolder and choose Open Getting-Started.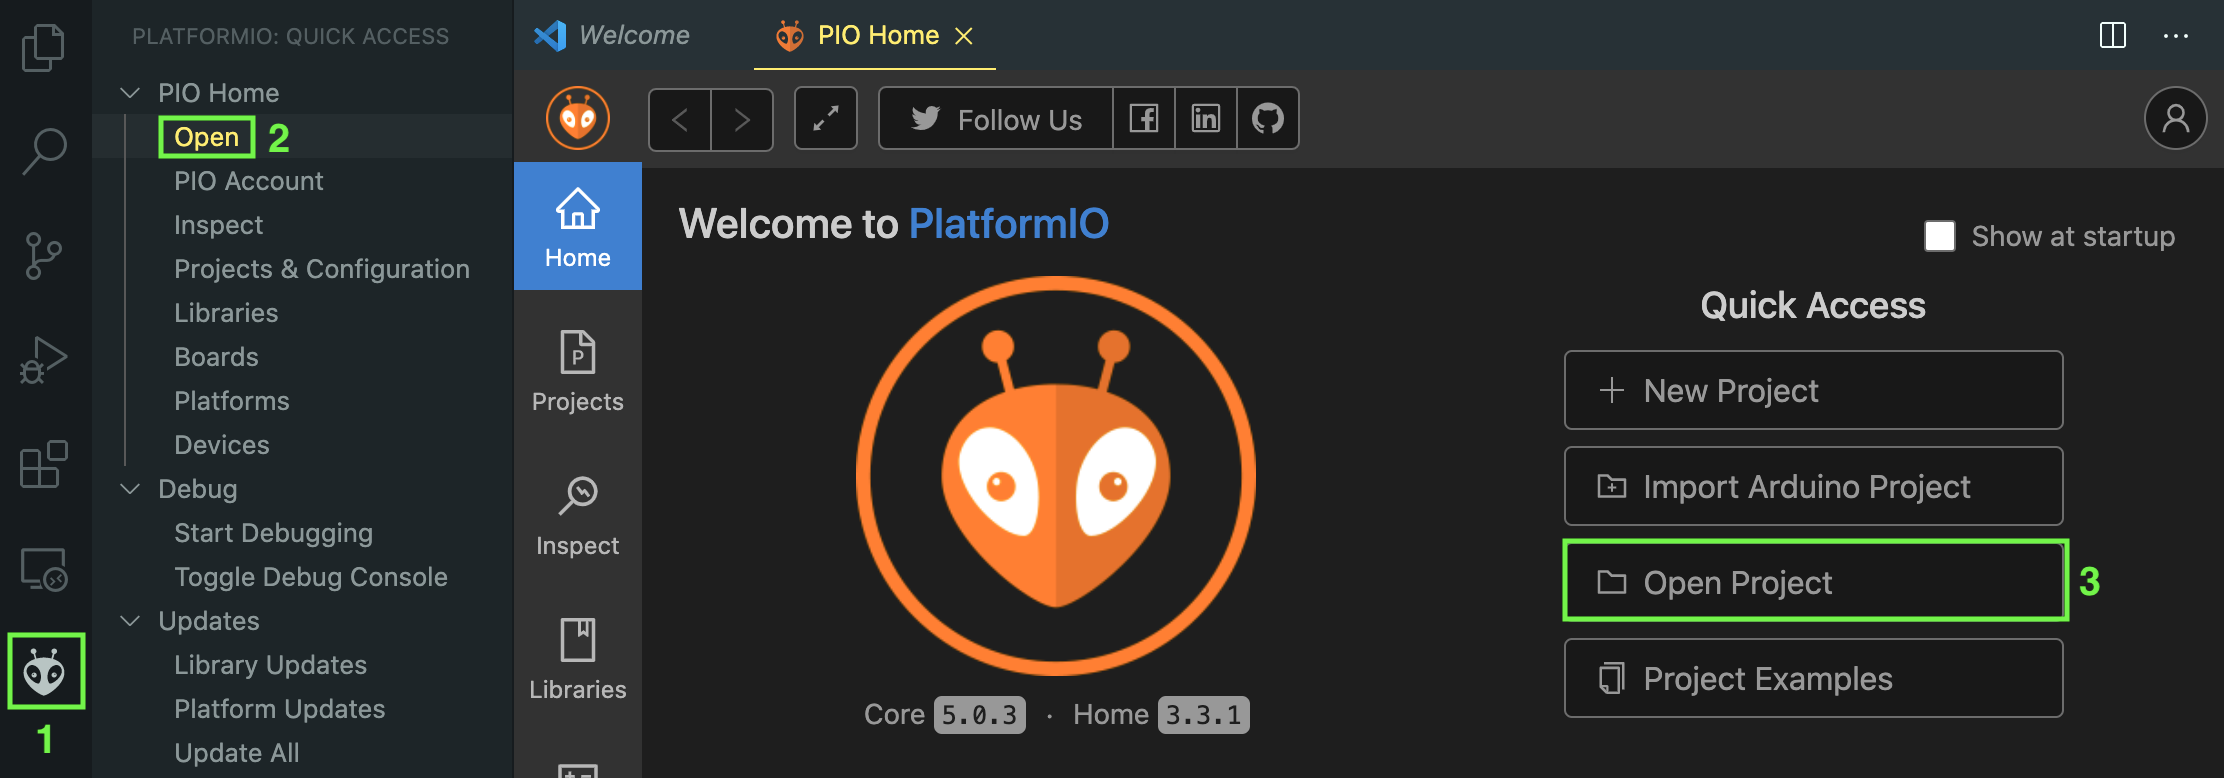
Build and upload the ESP RainMaker Agent firmware
You are now ready to build (compile) and upload the ESP RainMaker Agent firmware.
The GCC compiler converts the provided human readable code into object code as elf and binary files (the firmware). These files are then uploaded to the device’s on-board flash memory and run through the virtual serial port. The serial port (via UART) allows bi-directional communication. That means that the device can collect data and send it to the host machine.
Complete the following steps to build and upload the firmware to the Core2 for AWS and monitor the output from the device through the serial port using PlatformIO:
- Connect the Core2 for AWS to your host machine.
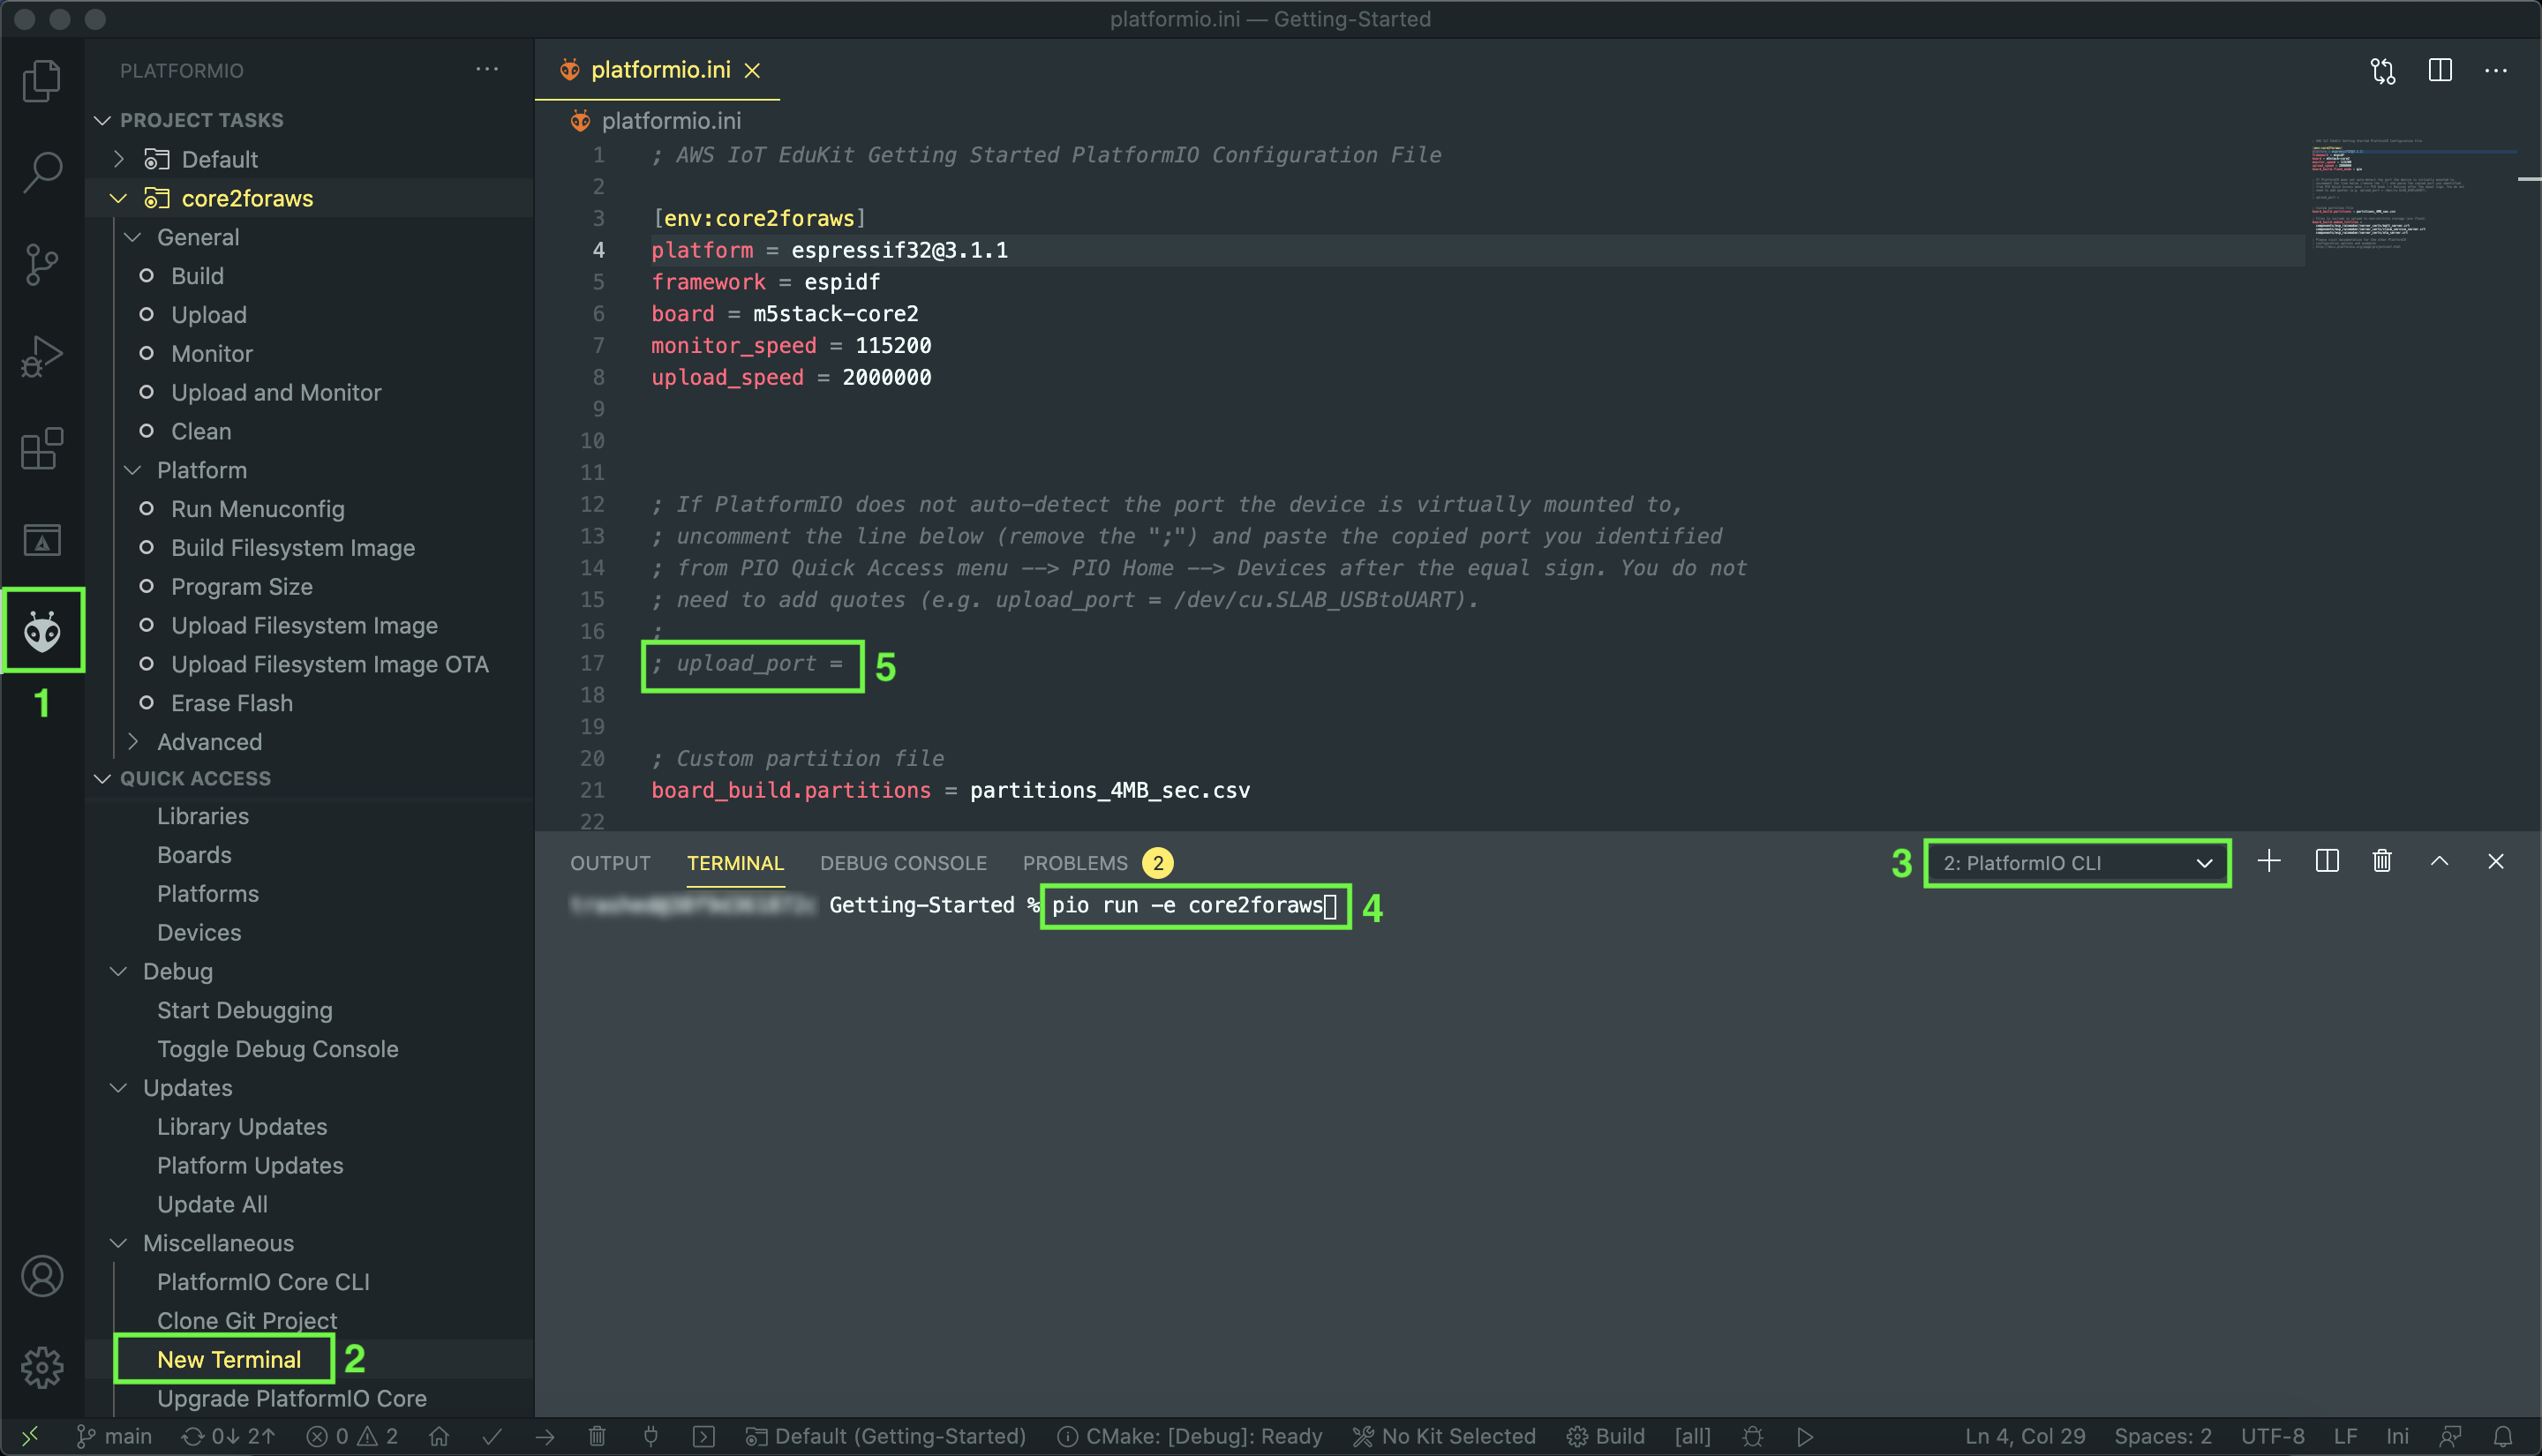
- Choose the PlatformIO logo on the VS Code activity bar to open the Quick Access menu.
- Expand Miscellaneous and choose New Terminal.
- To start the build process, type (or copy and paste) the following command (this will take several minutes) in the new terminal window that opened in VS Code:
pio run --environment core2foraws
PIO dependencies are installed in the background for the device platform. If those operations do not complete successfully, you might encounter an error. If you do receive an error, wait a couple of minutes and run the command again.
- Issue the following command to upload the compiled firmware to the connected device through USB, and monitor the messages sent over the serial output to the host machine:
pio run --environment core2foraws --target upload --target monitor
If you receive an error that the serial port timed out or there is an incorrect port number, open the platformio.ini file, and follow its instructions to manually set the upload port.
Claim and provision the device
Once the upload has successfully completed, the device will boot using the firmware that was just uploaded. It will also display the device’s serial output in the terminal viewport.
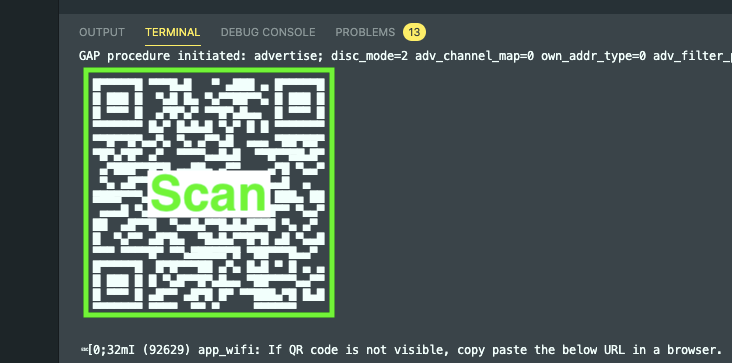
The device will generate security keys and perform an assisted claim . Key generation can take up to a few minutes to complete. When the assisted claiming process is complete, a quick response (QR) code displays on the terminal viewport.
Complete the following steps to add your Core2 for AWS to the application:
- Open the ESP RainMaker Phone application on your smartphone.
- Grant the application’s requested permissions and choose Add Device.
- Scan the QR code.
The application then performs the provisioning process and establishes a connection to your 2.4GHz wireless home network. After connecting successfully to your home Wi-Fi, the device authenticates itself, and your phone app populates with multiple virtual devices that you can view and control. If the ESP RainMaker app shows the virtual devices as offline, wait a minute or two and pull down the page to refresh the app.
With the virtual device listed and online in your mobile app, you can turn the on-board motor or LEDs on or off, adjust the speed of the motor, set the color and brightness of the LED bars, and view the internal device temperature.
If you entered the wrong Wi-Fi credentials, you must erase the firmware . To do this, upload the ESP RainMaker Agent firmware to the device a second time and add the device with your mobile phone again. For additional troubleshooting or FAQs, visit the official ESP RainMaker FAQs .
Erase the firmware with PlatformIO
Once you complete this process and are ready for the other tutorials, you must stop the active serial monitor and erase the device’s firmware.
Complete the following steps:
- Return to VS Code and enter CTRL+C in the PIO terminal to stop the serial monitor.
- Issue the following command to erase the firmware from the device’s flash memory:
pio run --environment core2foraws --target erase
When the command in the terminal window completes, the device may not automatically restart or appear to be different. Power the device off and then on to confirm that the firmware was flashed.
Erasing the firmware results in a blank device screen and an audible ticking sound. This is expected behavior. The device is continually rebooting itself because it doesn’t have an application to run.
Conclusion
Congratulations! During this lesson, you built a connected home application through the Core2 for AWS program. You now have the tools necessary to create, edit, compile, and flash embedded code onto your device! In the next tutorials, you will get more hands-on practice and learn how to start building your own end-to-end IoT solutions.
On to Cloud Connected Blinky !
Questions? Please use AWS re:Post
AWS IoT Kit now features direct access to
AWS re:Post
, which is a community-driven, questions-and-answers service. Search re:Post using the
AWS IoT Kit
tag to see if your question has been asked and answered. If not, ask a new question using the AWS IoT Kit tag.