Ubuntu Linux v18.0+ Setup Instructions
This lesson shows you how to set up your linux computer (host machine) to be able to download the code from the GitHub repository, view and edit the code, compile it to be usable by the hardware, and upload it to the hardware’s flash memory. These installation steps are sufficient for the Getting Started tutorial, which uses Espressif’s AWS account and services for the ESP RainMaker platform.
Install dependencies
In order to download the code, compile the code , and run scripts to download future dependencies using the Python programming language’s package installer , you’ll need to install some dependency libraries or applications first. To download the code from the remote code repository on GitHub, you’ll need to install git . To compile the code, Espressif uses the cmake build system to parse the configuration of the device application and the gcc compiler to compile the firmware to object code that the Core2 for AWS can understand and run. All the dependencies can be easily installed using apt via the following command in terminal:
sudo apt install build-essential python3-pip curl git cmake
Silicon Labs USB to UART bridge setup
The device communicates with the host machine through a Silicon Labs CP210x USB to UART bridge. The on-board CP2104 is an USB-to-UART bridge to facilitate host communication with the ESP32-D0WD microcontroller. The microcontroller communicates bi-directionally over UART 0, which the CP210x translates through a virtual communications port on the host machine it establishes over USB-C.
Linux kernel version 3.x.x and 4.x.x already include the drivers needed for the CP210x as part of the distribution. However, by default, serial communications is restricted to users that are part of the dialout group. To add your user to the dialout group, open the terminal and enter the following:
sudo usermod -a -G dialout $USER
You need to restart your host machine now to have the permissions applied.
Visual Studio Code installation
Visual Studio Code (VS Code) is an open source integrated development environment (IDE) which allows you to view, edit, manage code and more. Download the latest Visual Studio Code for your operating system. For troubleshooting issues with Visual Studio Code installation or usage, please refer to their documentation .
Installing PlatformIO
PlatformIO (PIO) provides a professional embedded development platform which simplifies embedded software development. The Visual Studio Code extension provides the functionality of the Platform IO command line interface (CLI) in a graphical interface. You can download the extension and read more about PlatformIO here .
You need to restart VS Code after the PlatformIO extension installation finishes.
Cloning the code repository
All of the projects and files exist in a GitHub repository , where you can also view the revision history of each file in the repository (repo). To clone the code you’ll need for the tutorials, you’ll be using the PIO interface:
- Click the PlatformIO logo on the VS Code activity bar (left most menu).
- From PlatformIO’s Quick Access menu, under Miscellaneous, select Clone Git Project.
- Paste
https://github.com/m5stack/Core2-for-AWS-IoT-EduKit.gitinto the text field and then select the location you want to save the project in.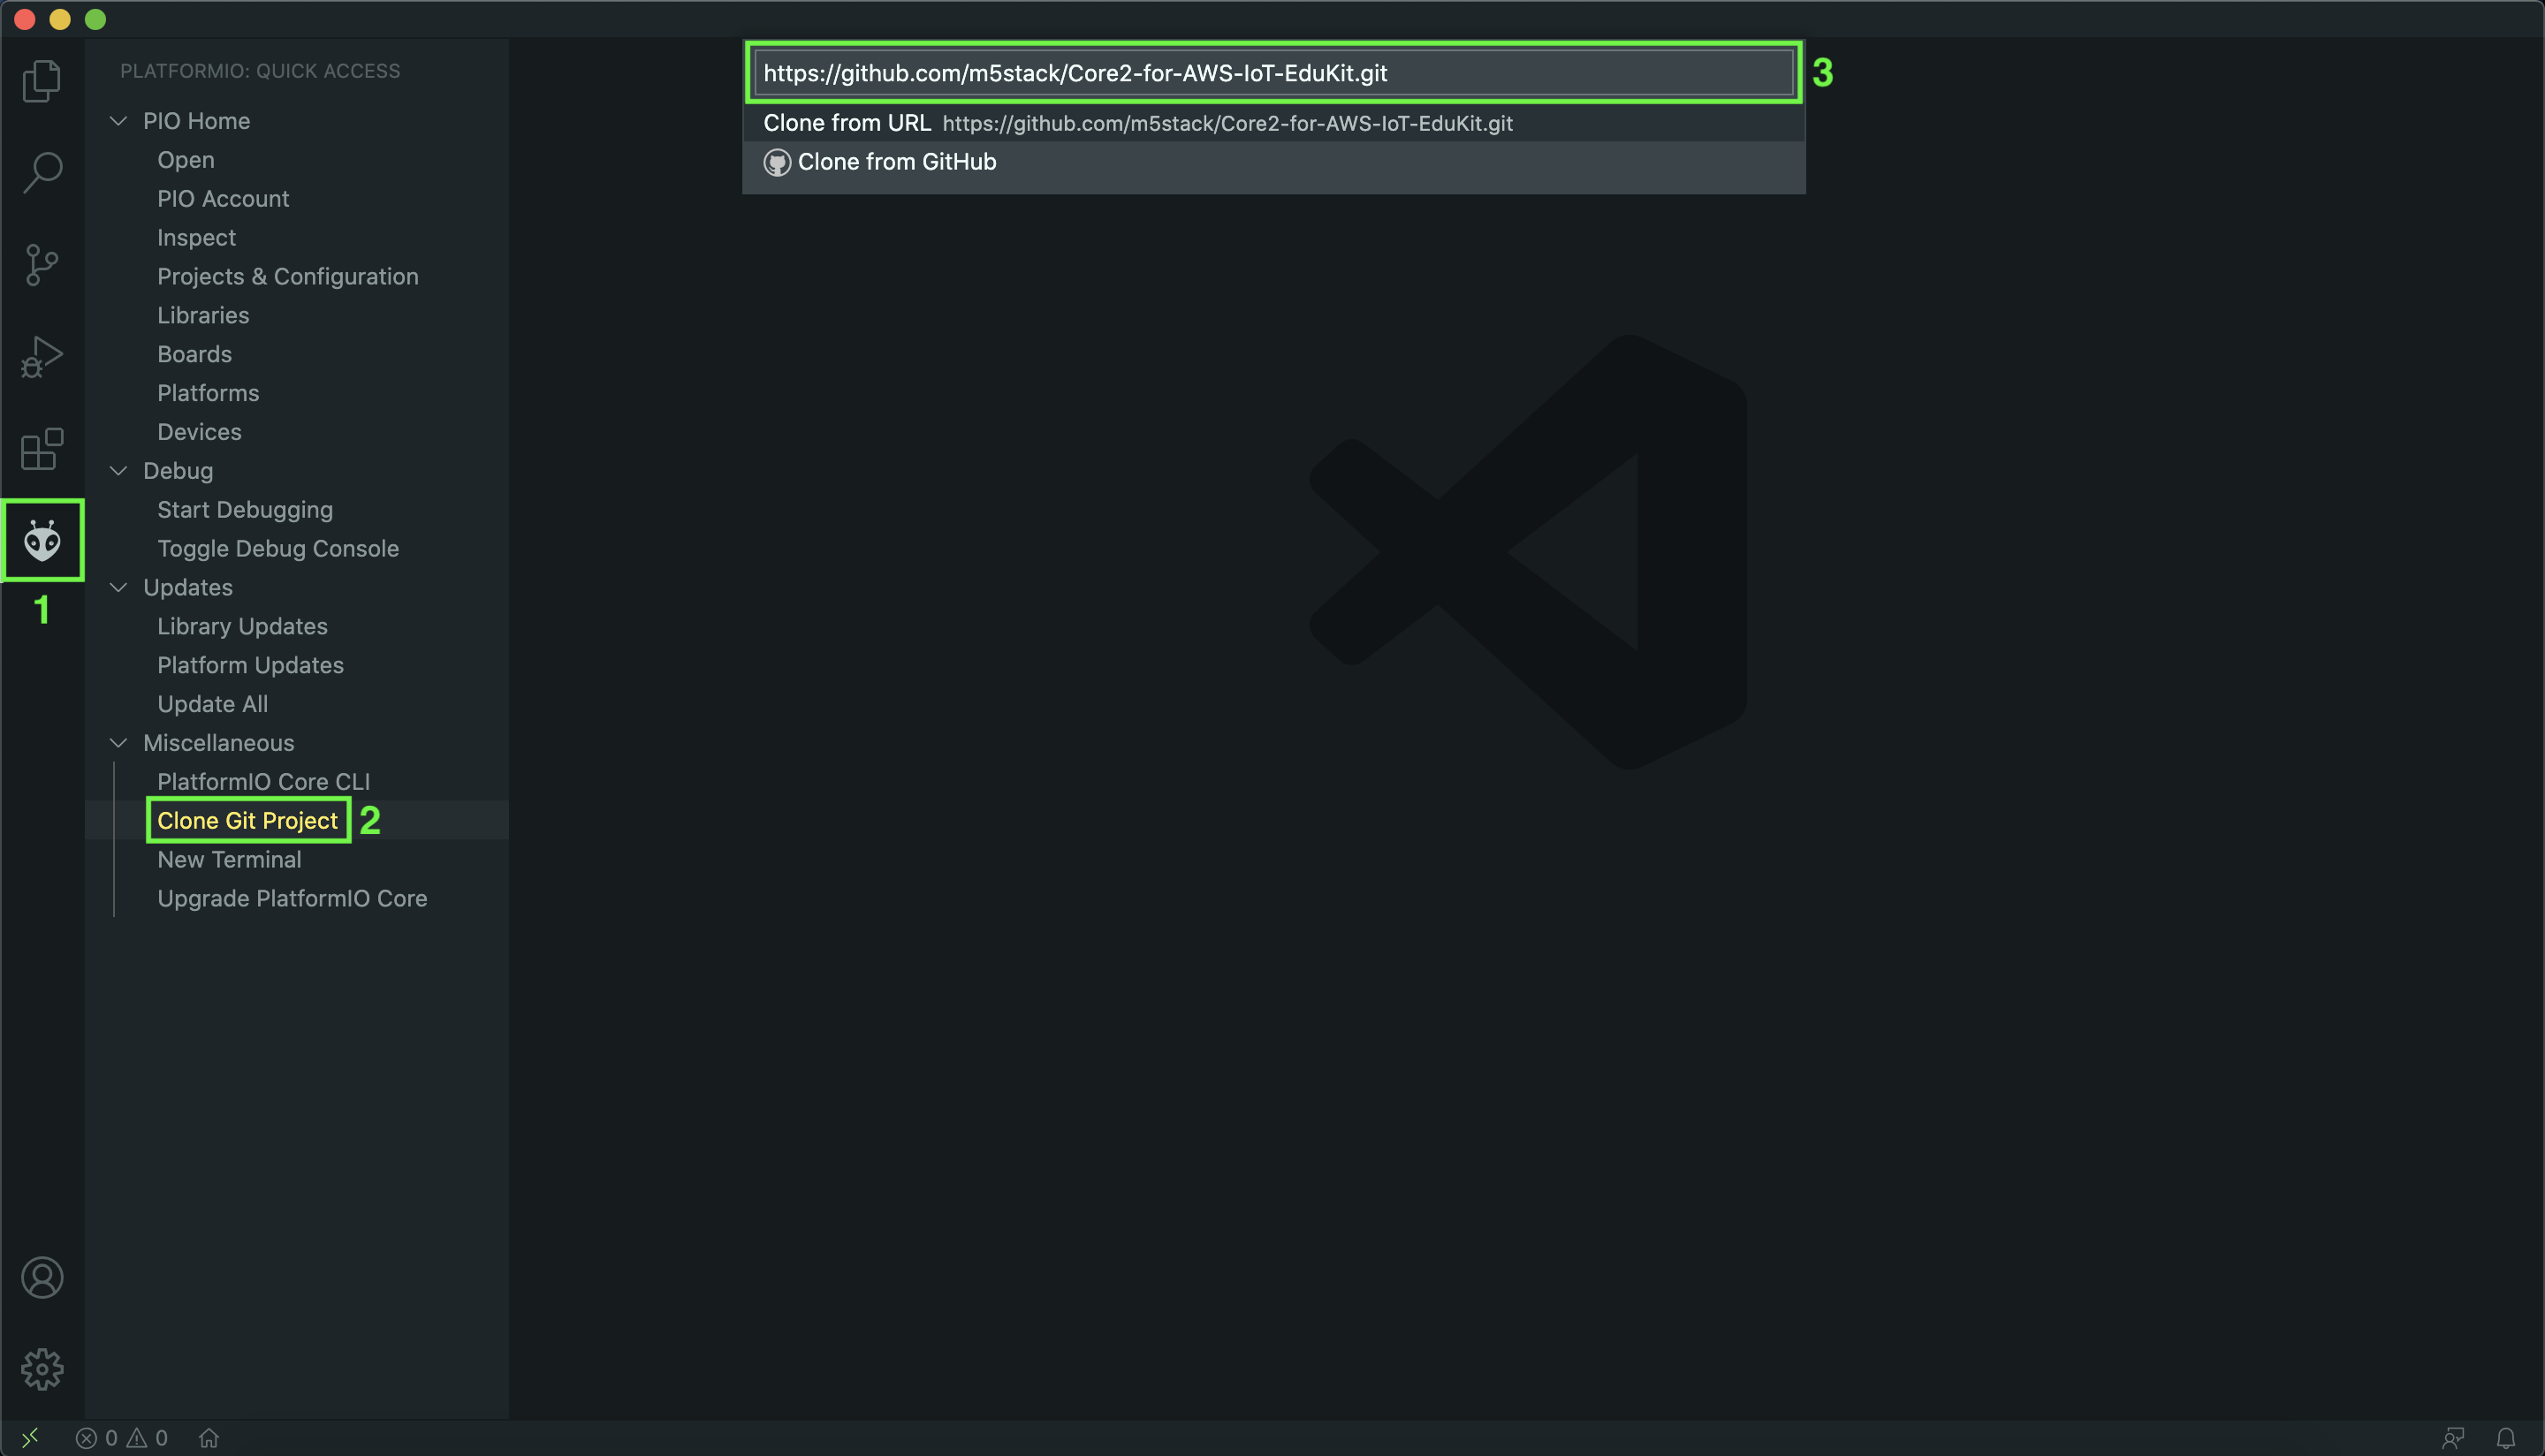
Downloading and installing the phone apps
The ESP RainMaker Phone Apps are available for iOS and Android phones to provide Wi-Fi network configuration, user-creation, user-device association and device control. The apps can be found here:
- Android: Google PlayStore , Direct APK
- iOS: Apple App Store
If you do not have a compatible Android or iOS device, you can use the RainMaker CLI and substitute the provided instructions.
Identifying the device communication port
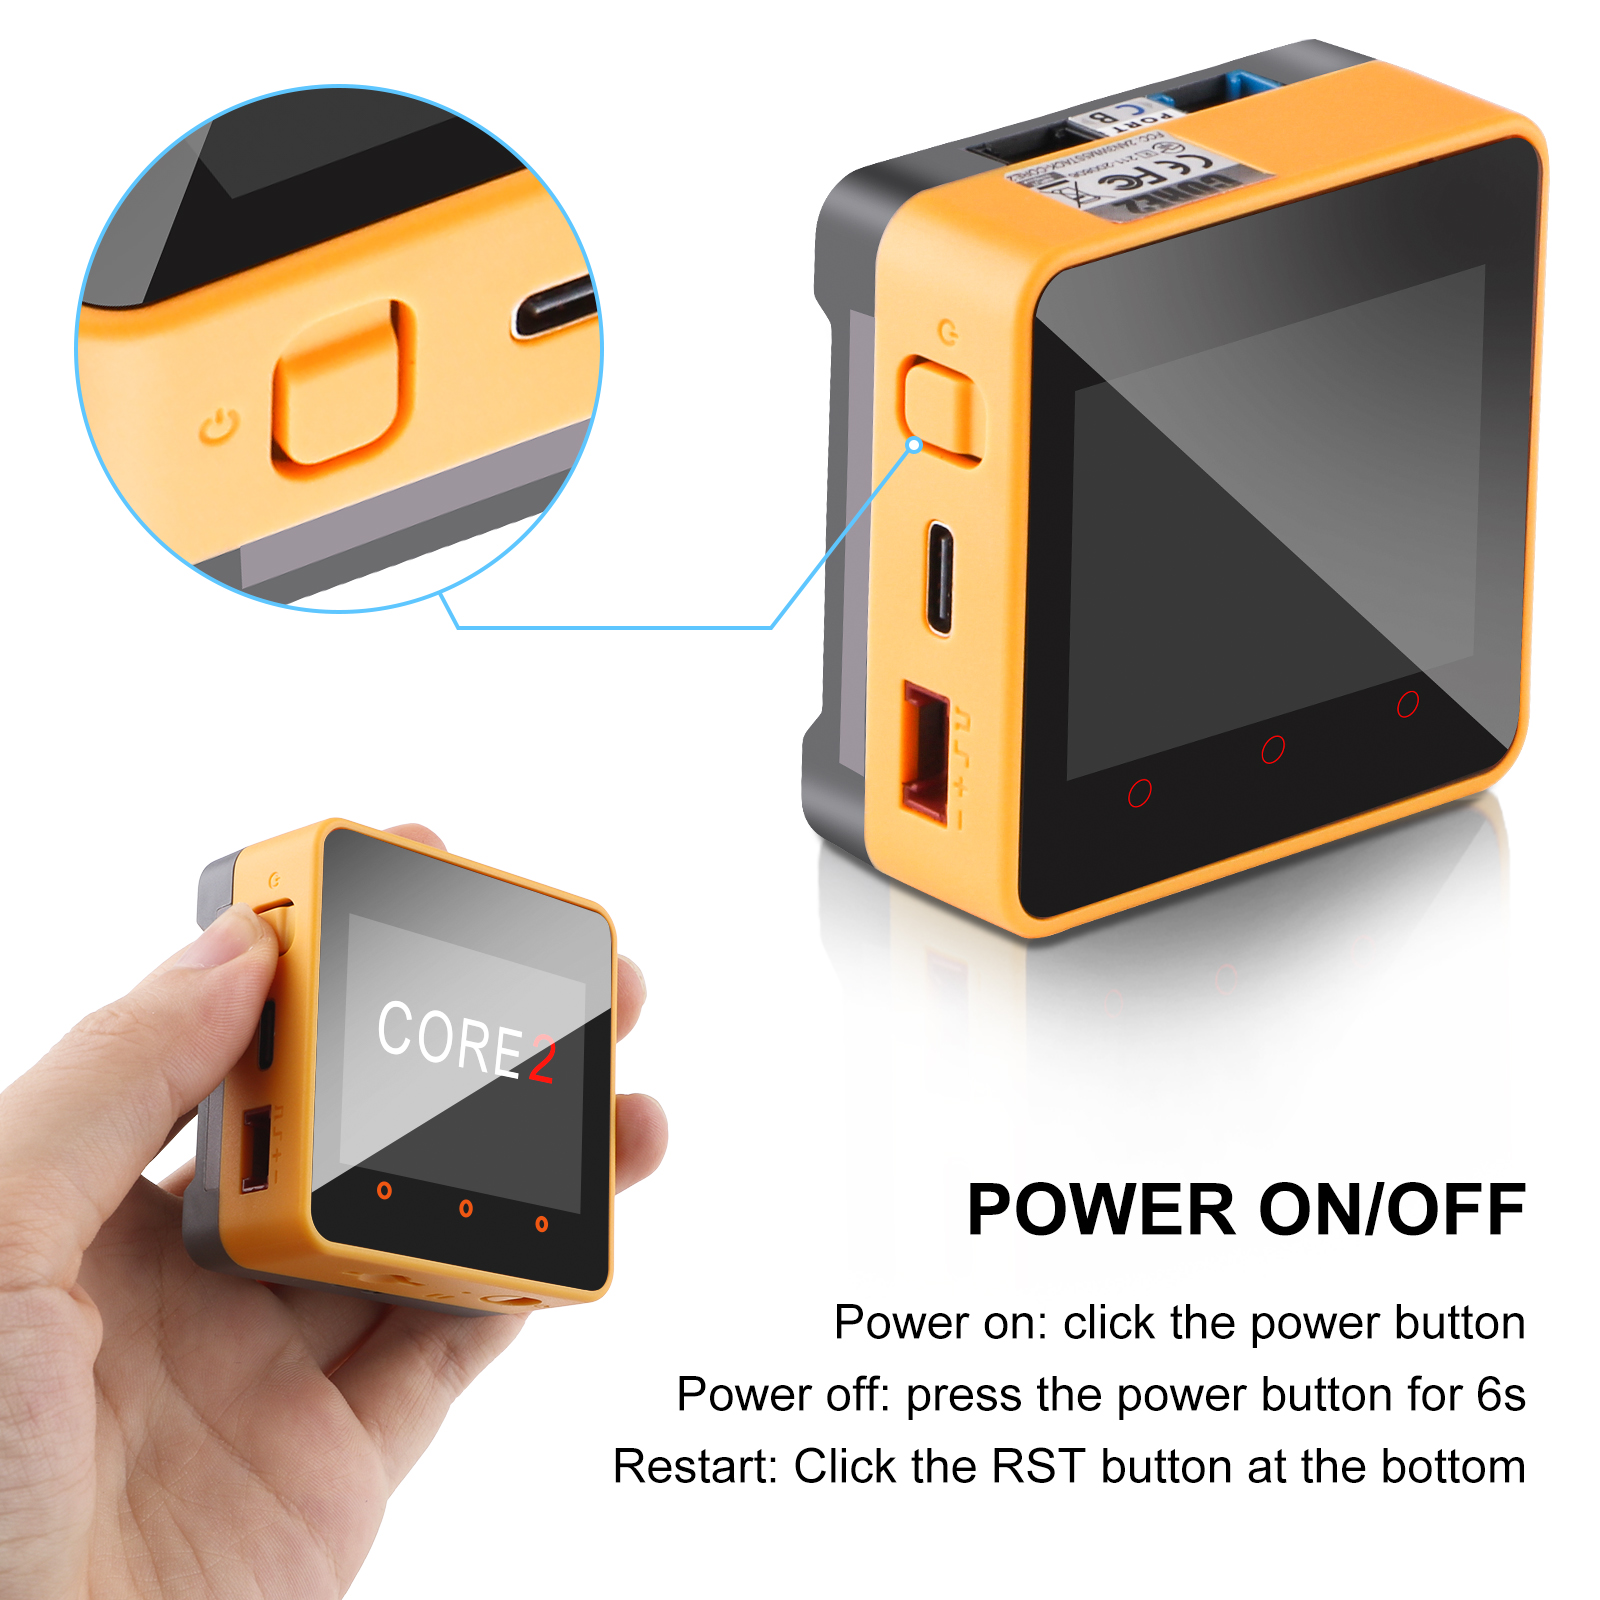
If you haven’t already, it’s time to unbox the Core2 for AWS and connect it to your host computer’s USB 2.0 port using the supplied USB-A to USB-C cable that allows communication between them. Additionally, included in the package is a hex key that can be used to install additional modules (sold separately). The device should automatically turn on once you plug it in, but if it doesn’t, press the power button.
With the device ready and the software you’ll need for this tutorial installed, let’s identify the port your device is virtually mounted to so that you can perform read & write operations to that specific port.
- From PlatformIO’s Quick Access menu, under PIO Home, select Devices.
- Click the icon next to the port with the description “CP2104 USB to UART Bridge Controller” (usually
/dev/ttyUSB0) to copy the device port.
If your Core2 for AWS does not show up in the list of devices, check that it’s powered on and you are using the supplied USB-A to USB-C cable. Some USB-C hubs have compatibility issues with establishing a serial port.
Next
With everything set up and your host machine ready and able to communicate with the Core2 for AWS, let’s continue to the next chapter — Running the ESP RainMaker Agent .
Questions? Please use AWS re:Post
AWS IoT Kit now features direct access to
AWS re:Post
, which is a community-driven, questions-and-answers service. Search re:Post using the
AWS IoT Kit
tag to see if your question has been asked and answered. If not, ask a new question using the AWS IoT Kit tag.