Building and Testing AFI
Introduction
In this chapter we will build the ported ESP VA-SDK firmware, flash it on to the device, provision the Wi-Fi and authorize the device to your Alexa Account, then test some of the smart home capabilities using Alexa voice commands available in this beta version of AFI.
Flash the firmware
Use the PlatformIO CLI to compile your firmware, upload the firmware, and monitor the serial output of your device. It will take some time to build and flash the app, but after that’s done you should see the stream of device logs in your terminal. If you receive an error for the port not being auto-detected, follow the Identifying the serial port on host machine instructions and try the command again. You can close the monitor session with the Ctrl + C keystroke combination:
pio run --environment core2foraws --target upload --target monitor
Provision the device
To provision the device, you must configure your Wi-Fi network credentials and authorize the application with your Alexa account using the ESP Alexa Phone Application.
Download the application from your mobile app store. iOS / Android
Provision steps:
- Launch the companion app.
- Make sure you have enabled the Bluetooth and the app has proper permissions to access Bluetooth.
- Select the option Add New Device.
- Your device will display in the app.
- You will see a Proof of Possession modal with a value of
abcdf1234or similar pop up. Simply press Done to continue.
- You will see a Proof of Possession modal with a value of
- After connecting to the device, you will sign into your Amazon account.
- Select the Wi-Fi network and enter the credentials.
- After a successful Wi-Fi connection, you will see a list of sample utterances.
Using Alexa
With the prior steps completed, you will see a number of logs in your serial monitor, including some like the following:
I (17325) [http_transport]: Subscribing /capabilities/acknowledge...
I (17535) [http_transport]: Subscribing /connection/fromservice...
I (17735) [http_transport]: Subscribing /directive...
I (17945) [http_transport]: Subscribing /speaker...
...
I (20735) [directive_proc]: Name: EndpointForwarding
...
I (22675) [directive_proc]: Name: SetAttentionState
...
E (22685) [app_va_cb]: Enabling Mic
In order to interact with Alexa, you will need to say Alexa to the device. This will trigger the Espressif Wake Word Engine running on the device to enter the LISTENING attention state. For full details on the different attention states, please refer to our documentation . For more information on audio capture, see the SpeechRecognizer API Documentation
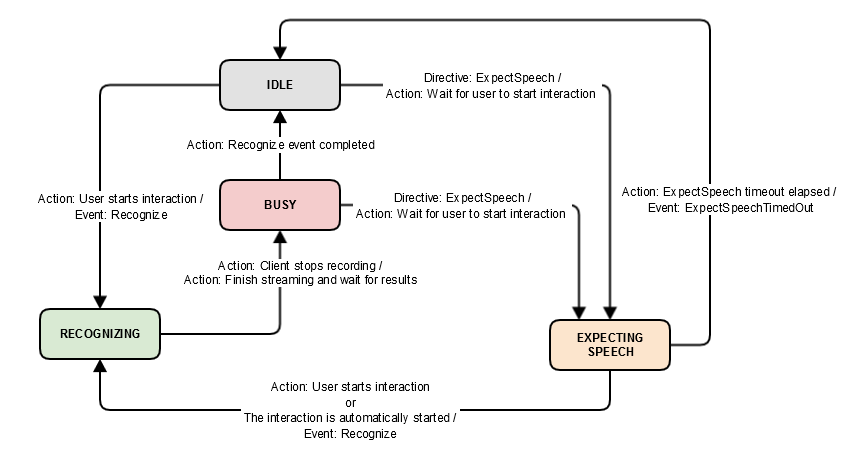
Just like any Alexa device, when the device is in the IDLE state, it is listening ONLY for the keyword “Alexa”. Only once the keyword is triggered will the device start streaming audio to the cloud.
Try a variety of utterances to Alexa - the side LEDs should light blue up when Alexa is heard (if Alexa does not “wake up”, try speaking closer to the device):
- Alexa, what time is it?
- Alexa, tell me a joke?
- Alexa, turn on all of the lights (Only works if you already have some Alexa smart home devices on your same account)
Test Alexa Smart Home Capabilities (Beta)
The AFI device has Alexa Built-In, which means you can speak to Alexa directly on the device and Alexa will respond with voice on the device. However, this version of AFI from Espressif also supports Alexa Smart Home commands as a beta feature, which allows you to control attributes on the device.
The Alexa for AWS IoT sample application creates a virtual device called Light in your Alexa app, which supports two interfaces:
- PowerController to turn the light on and off.
- RangeController to adjust the brightness of the device.
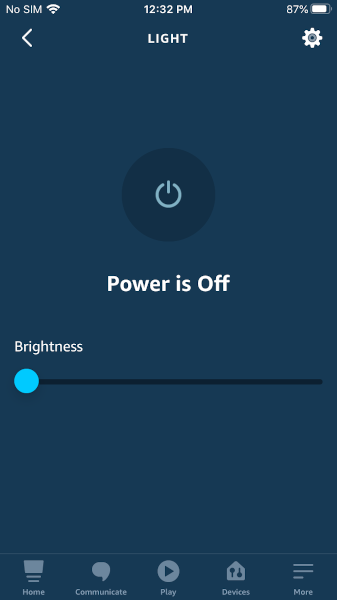
Since it’s a virtual device, it prints the updated status to the screen. We can test this out via voice or the Alexa app.
- By voice - say Alexa, turn on the light - if successful, Alexa may respond with “OK” or some other confirmation sound
- Via the Alexa app - open your Alexa mobile phone app (not the ESP Alexa mobile phone app), go to Devices and then either Lights or All Devices and you should see the device named Light (see screenshot above) or Demo Light. Tap the power icon and you should see the icon toggle between off and on.
With either option, you should see a message like the following in your terminal:
I (97445) [alexa_smart_home]: Namespace: Alexa.PowerController, Name: TurnOn
Similarly, you can try to control the range of the brightness by one of the following:
- By voice - say Alexa, set brightness on the light to 80 - if successful, Alexa may respond with “OK” or some other confirmation response.
- Via the Alexa app - adjust the brightness slider.
With either option, you should see a message like the following in the serial monitor:
[app_smart_home]: *************** Light's Brightness changed to 60 ***************
This is useful not only because we have voice assistant on our device with Alexa, but we can use Alexa to control properties on the device itself!
On to creating a Custom Smart Home Device .
Questions? Please use AWS re:Post
AWS IoT Kit now features direct access to
AWS re:Post
, which is a community-driven, questions-and-answers service. Search re:Post using the
AWS IoT Kit
tag to see if your question has been asked and answered. If not, ask a new question using the AWS IoT Kit tag.